You found the perfect font. You bought it. You downloaded it. And now you’re staring at a .zip file wondering what to do next.
Don’t worry — this happens to everyone. Getting a custom font from your downloads folder into your actual design tool is one of those things that nobody really explains clearly. Until now.
This guide walks you through installing and using custom fonts in the three most popular design tools: Canva, Figma, and Photoshop. Step by step, no jargon.
First: What’s Inside Your Font Download?
Before anything else, unzip your downloaded file. Inside you’ll typically find:
- One or more
.otf or .ttf files — these are the actual font files
- Sometimes a PDF or image showing the font preview
- Sometimes a license document (keep this!)
The .otf and .ttf files are what you need. Both formats work across all major tools and operating systems.
Installing on Your Computer (Do This First)
For Figma and Photoshop, you need to install the font on your computer before it shows up in the app.
On Mac:
- Double-click the
.otf or .ttf file
- A preview window opens — click “Install Font”
- Done. The font is now available system-wide.
On Windows:
- Right-click the
.otf or .ttf file
- Select “Install” or “Install for all users”
- Done.
Once installed, restart your design app if it was already open — most tools only load fonts at startup.
How to Use Custom Fonts in Canva
Canva handles fonts a little differently depending on which plan you’re on.
Canva Free — Limited Options The free plan doesn’t support uploading custom fonts. You’re limited to Canva’s built-in font library. If you want to use fonts from Artisan Font in Canva, you’ll need to upgrade.
Canva Pro, Teams, or Education — Upload Custom Fonts
- Go to Brand Kit (found in the left sidebar or under your account)
- Scroll down to the Fonts section
- Click “Upload a font”
- Select your
.otf or .ttf file and upload
- Your font will appear in your Brand Kit and be available across all your Canva designs
Pro tip: If you have a font family with multiple weights (Regular, Bold, Italic), upload each file separately. Canva will group them together automatically.
Using the font in your design: Once uploaded, open any design, click on a text element, go to the font dropdown, and look for the “Uploaded Fonts” section at the top of the list.
How to Use Custom Fonts in Figma
Figma is browser-based, which means it needs a little help to access fonts installed on your computer.
Step 1 — Install Figma Font Helper Download and install the Figma Font Helper (or Figma Desktop App) from figma.com. This small utility lets Figma access your locally installed fonts.
Step 2 — Install your font on your computer Follow the Mac or Windows steps above to install the font at the system level.
Step 3 — Restart Figma Close and reopen Figma (or refresh the browser tab if you’re using the web version).
Step 4 — Use the font Click on any text layer in Figma, open the font dropdown in the right sidebar, and search for your font by name. It should appear under your local fonts.
Using Figma Desktop App? If you use the Figma desktop app instead of the browser version, it accesses local fonts automatically once they’re installed — no Font Helper needed.
Pro tip: Variable fonts work great in Figma. If your Artisan Font purchase includes a variable version, you can control weight and width with a slider directly in the Type panel.
How to Use Custom Fonts in Photoshop
Photoshop uses your system fonts directly, so this one is the most straightforward.
Step 1 — Install the font on your computer Use the Mac or Windows steps above.
Step 2 — Restart Photoshop If Photoshop was already open, close it completely and reopen it. Photoshop loads fonts at startup.
Step 3 — Find and use your font Select the Type tool (T), click on your canvas, and open the font dropdown in the top toolbar. Search for your font name — it should appear in the list.
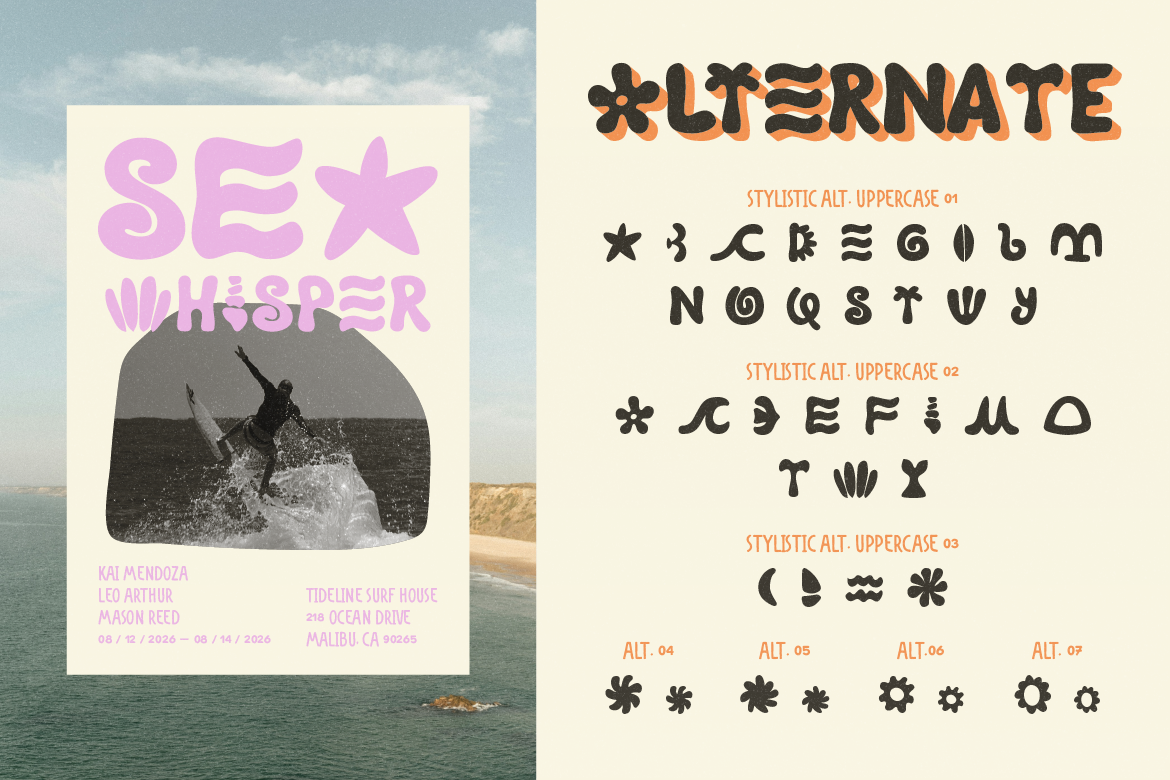
Using OpenType features in Photoshop: Many Artisan fonts include OpenType features like alternate characters, ligatures, and swashes. To access these in Photoshop:
- Select your text
- Go to Window → Glyphs
- The Glyphs panel shows every character in the font — double-click any glyph to insert it
This is especially useful for fonts like Cantilos or Lisaline, where the alternate characters and swashes are part of what makes the font special.
Troubleshooting: Font Not Showing Up?
A few common fixes:
The app was open when you installed the font. Close and reopen the app — most tools only load fonts at launch.
You unzipped the file but didn’t install the font. Having the file in your downloads folder isn’t enough. You need to actually install it (double-click on Mac, right-click → Install on Windows).
Canva isn’t showing your uploaded font. Make sure you’re on a paid Canva plan. Free accounts don’t support custom font uploads.
Figma still can’t find it. Make sure Figma Font Helper is installed and running, or switch to the Figma desktop app.
The font file is .woff or .woff2. These are web font formats and won’t install on your system. Check if your download includes an .otf or .ttf version — most Artisan Font purchases include both.
Once you’ve got the install process down, you’ll be dropping new fonts into your workflow in under two minutes. Want to browse the Artisan font collection? Let’s check out artisanfont.com!